3.から11.まである。最低限コピーしてコンパイルでできる問題はすべてやること。そのような問題は5問あります。
ボタンの数を2つ、ラベルの数を3つにして次の様に配置する。
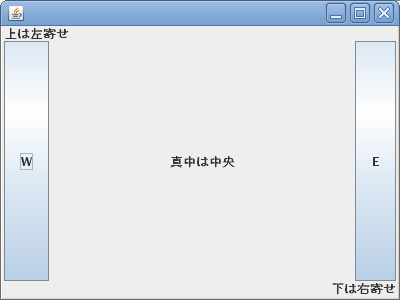
フレームの大きさを400×300と指定しているので不格好です。
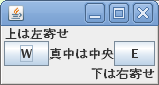
setVisible(true);の前に pack();という指示を加えると、次のように不要な部分をカットしてすっきりしてくれます。
/**
 *  ラベルとボタンを配置
 */
import javax.swing.*;
import java.awt.*;   //BorderLayout()を使うために

public class ButtonTest3 extends JFrame{
	/* コンストラクタ */
	public ButtonTest3(){
		setSize(400, 300);                 //サイズを指定
		setDefaultCloseOperation(EXIT_ON_CLOSE); //終了処理を追加

		JLabel labell = new JLabel("上は左寄せ");
		JLabel labelc = new JLabel("真中は中央",JLabel.CENTER);
		JLabel labelr = new JLabel("下は右寄せ",JLabel.RIGHT);
		JButton buttonw = new JButton("W");
		JButton buttone = new JButton("E");

		setLayout(new BorderLayout());     //レイアウトマネージャを指定

		add(labell, BorderLayout.NORTH);
		add(labelc, BorderLayout.CENTER);
		add(labelr, BorderLayout.SOUTH);
		add(buttonw, BorderLayout.WEST);
		add(buttone, BorderLayout.EAST);
		pack();
		setVisible(true);                  //実際に表示する
	}
	/********* main **********/
	public static void main(String[] args){
		ButtonTest3 myframe = new ButtonTest3();
	}
}
JLabelの左寄せは JLabel.LEFT だが、省略すると左寄せになる。省略する時は , も書かない。
次のレイアウトになる様に、ButtonTest4.java を完成させなさい
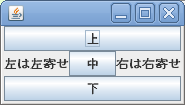
今度はボタンが3つでラベルが2つである。インスタンスの名前も変わっているので注意。もちろんButtonTest3が参考になる。//ここから から //ここまで までに5行書くことで完成する。
/**
 *  ラベルとボタンを配置
 */
import javax.swing.*;
import java.awt.*;   //BorderLayout()を使うために

public class ButtonTest4 extends JFrame{
	/* コンストラクタ */
	public ButtonTest4(){
		setSize(400, 300);                 //サイズを指定
		setDefaultCloseOperation(EXIT_ON_CLOSE); //終了処理を追加

		JLabel mylabel1 = new JLabel("左は左寄せ",JLabel.LEFT);
		JLabel mylabel2 = new JLabel("右は右寄せ",JLabel.RIGHT);
		JButton mybutton1 = new JButton("上");
		JButton mybutton2 = new JButton("中");
		JButton mybutton3 = new JButton("下");

		setLayout(new BorderLayout());     //レイアウトマネージャを指定

		//ここから


                //ここまで
		pack();
		setVisible(true);                  //実際に表示する
	}
	/********* main **********/
	public static void main(String[] args){
		ButtonTest4 myframe = new ButtonTest4();
	}
}
東西に置くと幅がギリギリまで詰められるので、ラベルの左寄せや右寄せは効果がない。
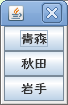
ButtonTest5.java は完成されたプログラムである。実行して次の図の様になることを確認しなさい。
さらに NORTH, CENTER, SOUTH を NORTH, WEST, SOUTH にしてもレイアウトに変化のないことを確認しなさい。
import javax.swing.*;
import java.awt.*;   //BorderLayout()を使うために

public class ButtonTest5 extends JFrame{
	/* コンストラクタ */
	public ButtonTest5(){
		setSize(400, 300);                 //サイズを指定
		setDefaultCloseOperation(EXIT_ON_CLOSE); //終了処理を追加

		JButton aobutton = new JButton("青森");
		JButton akibutton = new JButton("秋田");
		JButton iwabutton = new JButton("岩手");

		setLayout(new BorderLayout());     //レイアウトマネージャを指定

		add(aobutton, BorderLayout.NORTH);
		add(akibutton, BorderLayout.CENTER);
		add(iwabutton, BorderLayout.SOUTH);
		pack();
		setVisible(true);                  //実際に表示する
	}
	/********* main **********/
	public static void main(String[] args){
		ButtonTest5 myframe = new ButtonTest5();
	}
}
次のレイアウトになる様に、ButtonTest6.java を完成させなさい
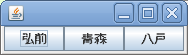
3箇所の ??? に、NORTH, CENTER, SOUTH, WEST, EAST のどれかを入れるだけでよい。地名が図の順番に並ぶようにする。
import javax.swing.*;
import java.awt.*;   //BorderLayout()を使うために

public class ButtonTest6 extends JFrame{
	/* コンストラクタ */
	public ButtonTest6(){
		setSize(400, 300);                 //サイズを指定
		setDefaultCloseOperation(EXIT_ON_CLOSE); //終了処理を追加

		JButton aobutton = new JButton("青森");
		JButton hibutton = new JButton("弘前");
		JButton habutton = new JButton("八戸");

		setLayout(new BorderLayout());     //レイアウトマネージャを指定

		add(aobutton, BorderLayout.???);
		add(hibutton, BorderLayout.???);
		add(habutton, BorderLayout.???);
		pack();
		setVisible(true);                  //実際に表示する
	}
	/********* main **********/
	public static void main(String[] args){
		ButtonTest6 myframe = new ButtonTest6();
	}
}
次のレイアウトになる様に、ButtonTest7.java を完成させなさい
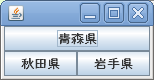
3箇所の ??? に、NORTH, CENTER, SOUTH, WEST, EAST のどれかを入れるだけでよい。地名が図の順番に並ぶようにする。
import javax.swing.*;
import java.awt.*;   //BorderLayout()を使うために

public class ButtonTest7 extends JFrame{
	/* コンストラクタ */
	public ButtonTest7(){
		setSize(400, 300);                 //サイズを指定
		setDefaultCloseOperation(EXIT_ON_CLOSE); //終了処理を追加

		JButton aobutton = new JButton("青森県");
		JButton akibutton = new JButton("秋田県");
		JButton iwabutton = new JButton("岩手県");

		setLayout(new BorderLayout());     //レイアウトマネージャを指定

		add(aobutton, BorderLayout.???);
		add(akibutton, BorderLayout.???);
		add(iwabutton, BorderLayout.???);
		pack();
		setVisible(true);                  //実際に表示する
	}
	/********* main **********/
	public static void main(String[] args){
		ButtonTest7 myframe = new ButtonTest7();
	}
}
BorderLayout がかなりいろいろな場面で使えることが理解できたであろうか。
ButtonTest8.java を実行してどのようなレイアウトになるか確かめなさい
import javax.swing.*;
import java.awt.*;   //BorderLayout()を使うために

public class ButtonTest8 extends JFrame{
	/* コンストラクタ */
	public ButtonTest8(){
		setDefaultCloseOperation(EXIT_ON_CLOSE); //終了処理を追加

		JButton aobutton = new JButton("青森県");
		JButton akibutton = new JButton("秋田県");
		JButton iwabutton = new JButton("岩手県");
		JButton yambutton = new JButton("山形県");
		JButton miybutton = new JButton("宮城県");
		JButton fukbutton = new JButton("福島県");

		setLayout(new GridLayout(6,1,0,0));   //レイアウトマネージャを指定

		add(aobutton);
		add(akibutton);
		add(iwabutton);
		add(yambutton);
		add(miybutton);
		add(fukbutton);

		pack();
		setVisible(true);                  //実際に表示する
	}
	/********* main **********/
	public static void main(String[] args){
		ButtonTest8 myframe = new ButtonTest8();
	}
}
ButtonTest9.java を実行してどのようなレイアウトになるか確かめなさい
import javax.swing.*;
import java.awt.*;   //BorderLayout()を使うために

public class ButtonTest9 extends JFrame{
	/* コンストラクタ */
	public ButtonTest9(){
		setDefaultCloseOperation(EXIT_ON_CLOSE); //終了処理を追加

		JButton aobutton = new JButton("青森県");
		JButton akibutton = new JButton("秋田県");
		JButton iwabutton = new JButton("岩手県");
		JButton yambutton = new JButton("山形県");
		JButton miybutton = new JButton("宮城県");
		JButton fukbutton = new JButton("福島県");

		setLayout(new GridLayout(1,6,0,0));   //レイアウトマネージャを指定

		add(aobutton);
		add(akibutton);
		add(iwabutton);
		add(yambutton);
		add(miybutton);
		add(fukbutton);

		pack();
		setVisible(true);                  //実際に表示する
	}
	/********* main **********/
	public static void main(String[] args){
		ButtonTest9 myframe = new ButtonTest9();
	}
}
ButtonTest10.java を実行してどのようなレイアウトになるか確かめなさい
import javax.swing.*;
import java.awt.*;   //BorderLayout()を使うために

public class ButtonTest10 extends JFrame{
	/* コンストラクタ */
	public ButtonTest10(){
		setDefaultCloseOperation(EXIT_ON_CLOSE); //終了処理を追加

		JButton aobutton = new JButton("青森県");
		JButton akibutton = new JButton("秋田県");
		JButton iwabutton = new JButton("岩手県");
		JButton yambutton = new JButton("山形県");
		JButton miybutton = new JButton("宮城県");
		JButton fukbutton = new JButton("福島県");

		setLayout(new GridLayout(3,2,0,0));   //レイアウトマネージャを指定

		add(aobutton);
		add(akibutton);
		add(iwabutton);
		add(yambutton);
		add(miybutton);
		add(fukbutton);

		pack();
		setVisible(true);                  //実際に表示する
	}
	/********* main **********/
	public static void main(String[] args){
		ButtonTest10 myframe = new ButtonTest10();
	}
}
次のレイアウトになる様に、ButtonTest11.java を完成させなさい
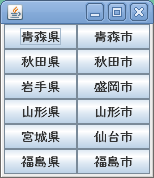
今度はボタンが12である。増えたインスタンスの名前に注意。もちろんButtonTest10が参考になる。//ここから から //ここまで までに12行書くことで完成する。
import javax.swing.*;
import java.awt.*;   //BorderLayout()を使うために

public class ButtonTest11 extends JFrame{
	/* コンストラクタ */
	public ButtonTest11(){
		setDefaultCloseOperation(EXIT_ON_CLOSE); //終了処理を追加

		JButton aobutton = new JButton("青森県");
		JButton akibutton = new JButton("秋田県");
		JButton iwabutton = new JButton("岩手県");
		JButton yambutton = new JButton("山形県");
		JButton miybutton = new JButton("宮城県");
		JButton saobutton = new JButton("青森市");
		JButton sakibutton = new JButton("秋田市");
		JButton siwabutton = new JButton("盛岡市");
		JButton syambutton = new JButton("山形市");
		JButton smiybutton = new JButton("仙台市");
		JButton sfukbutton = new JButton("福島市");
		JButton sfukbutton = new JButton("福島県");

		setLayout(new GridLayout(6,2,0,0));   //レイアウトマネージャを指定

		//ここから


                //ここまで

		pack();
		setVisible(true);                  //実際に表示する
	}
	/********* main **********/
	public static void main(String[] args){
		ButtonTest11 myframe = new ButtonTest11();
	}
}